Network Setup
NSX Setup
With NSX 6.1, NSX Manager can deploy all the required components through vSphere WebClient.
For the nested environment, NSX Manager requires following to deploy other NSX Components (Controller, Edge etc)
- Pool of Static IPs
- DNS server access
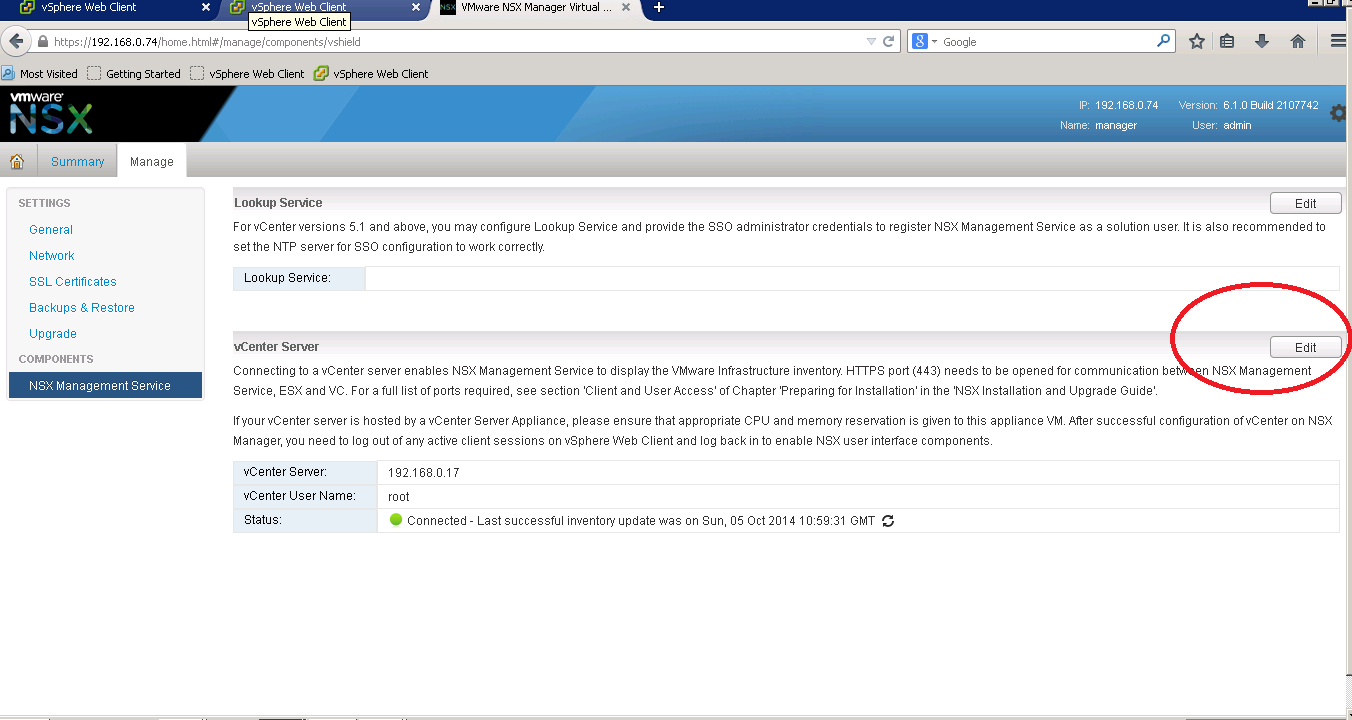
After deploying NSX Manager, it is time to connect NSX Manager to Virtual Center. Login into NSX Manager Web UI (https://<nsxipaddress>)
The default user account is admin/default. Under Manage Tab, select NSX Management Service and click on Edit button as shown below
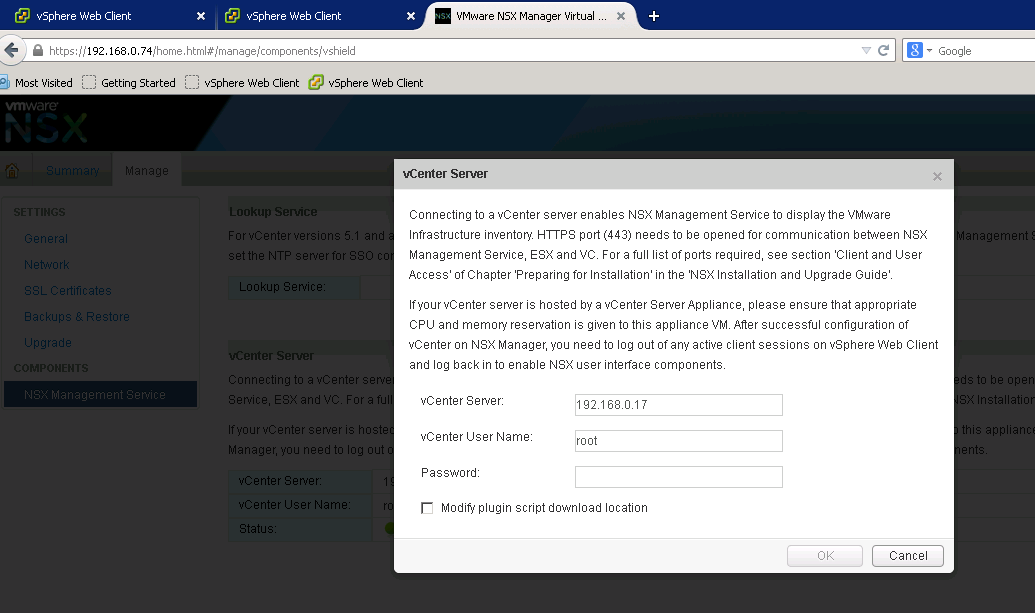
Add vCenter details under popup window
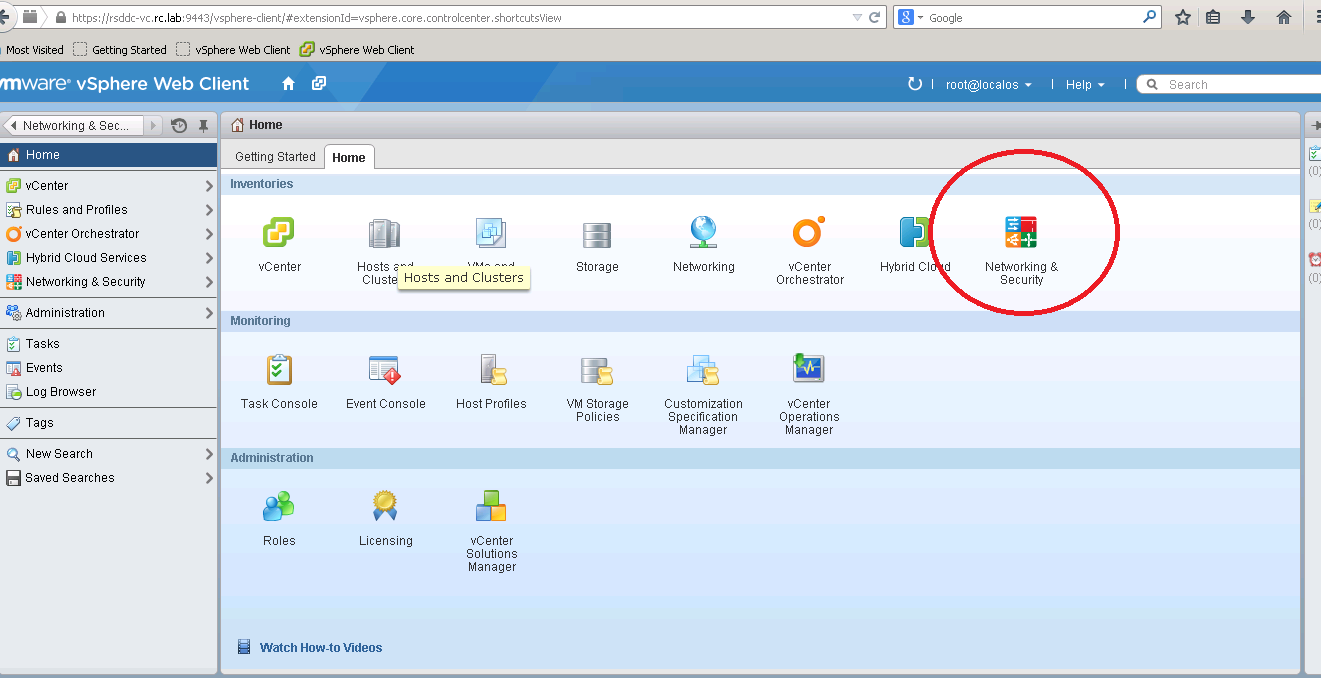
Once NSX is registered with Vcenter, you can deploy NSX components from vSphere Web Client. You can see Networking&Security tab under Home section of vSphere Web Client (You might need to logout and login to see this tab)
Adding NSX Controller
First step is to install NSX Controller. NSX Controller is brain of Network Function Virtualization. It manages and maintains all network related functionality. Three NSX Controllers are recommended in production environment for high availability.
We are going to add two NSX Controller one for RSDDC-MgmtCluster and one for RSDDC-CompCluster. Add new NSX Controller to RSDDC-MgmtCluster and RSDDC-CompCluster
Click green “+” sign that will popup details to add
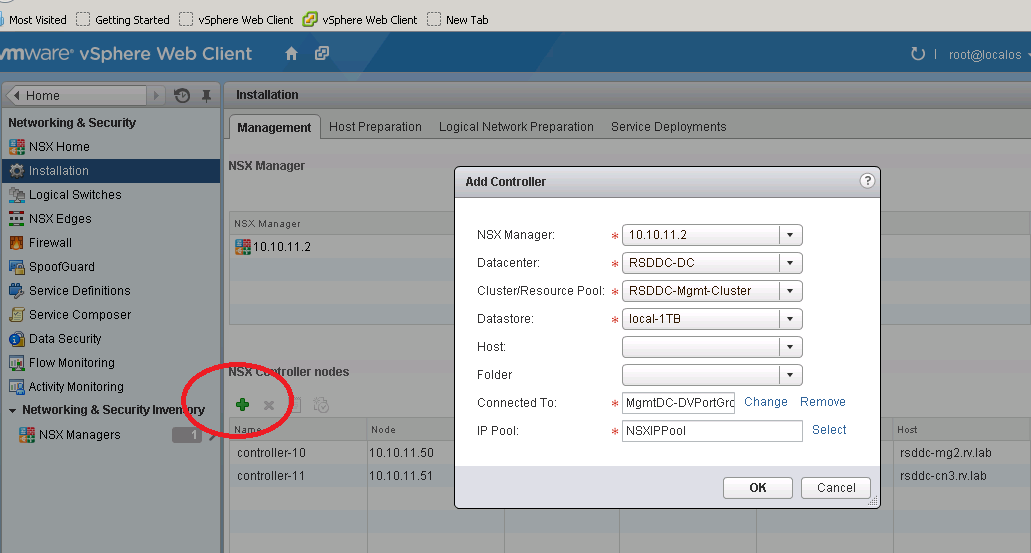
Add IP Pool for NSX Components
We will need IP Pool that can be utilized by NSX Manager to assign static IPs. I have created NSXIPPool and assign 10 static IPs as shown below

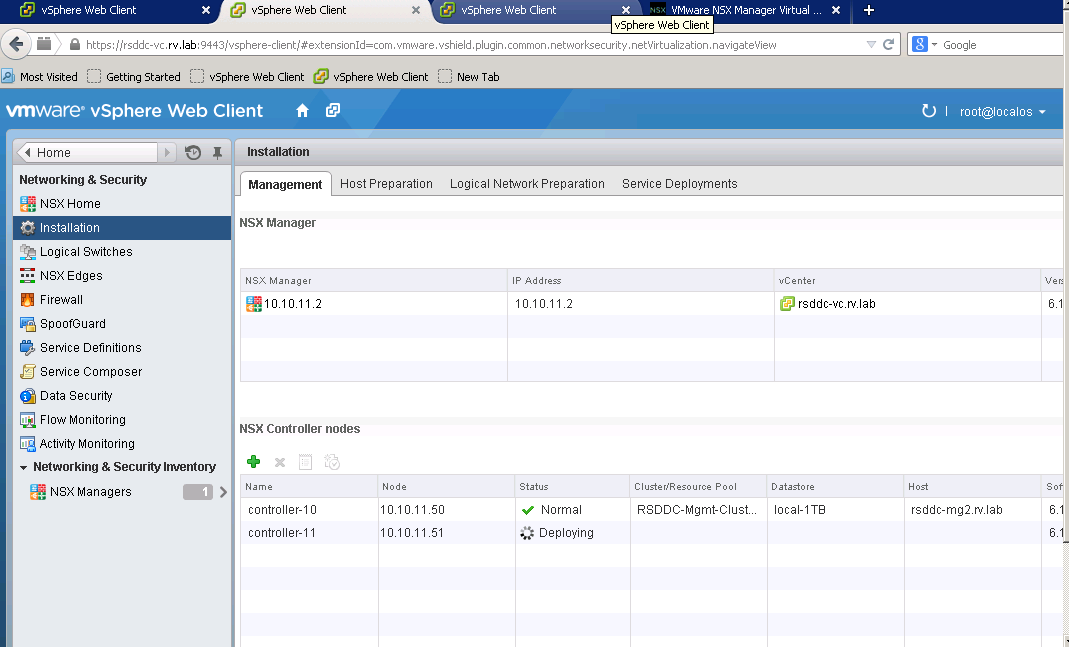
Debug Stuff: I find it usefull to check NSX Controller VM booting up. I think IP Pool and DNS server are critical for NSX Controller coming up and joining NSX Cluster.
NSX Manager uses ovf transfer to send NSX Controller image to cluster. If deployment fails, I find the errors shown are bit cryptic. However I find NSX Manager manager log is very useful. To enable NSX Manager log, first enable SSH service on Summary page of NSX Manager Web Interface.
SShing to NSX Manager and parse NSX Manager Log
$ ssh admin@rsddc-nsx.rv.lab admin@rsddc-nsx.rv.lab’s password: rsddc-nsx.rv.lab> enable Password: rsddc-nsx.rv.lab# show manager log reverseIf you search log ovf then you can
ending HttpNfcLease.. INFO HttpNfcLeaseExtender HttpNfcLeaseExtender:46 – Ext ending HttpNfcLease.. INFO taskScheduler-30 ResourcePoolVcOperationsImpl:134 – Local file path: ‘/common/em/components/vdn/controller/ovf/nsx-controller-4.0.4-build38430-disk1.vmdk’
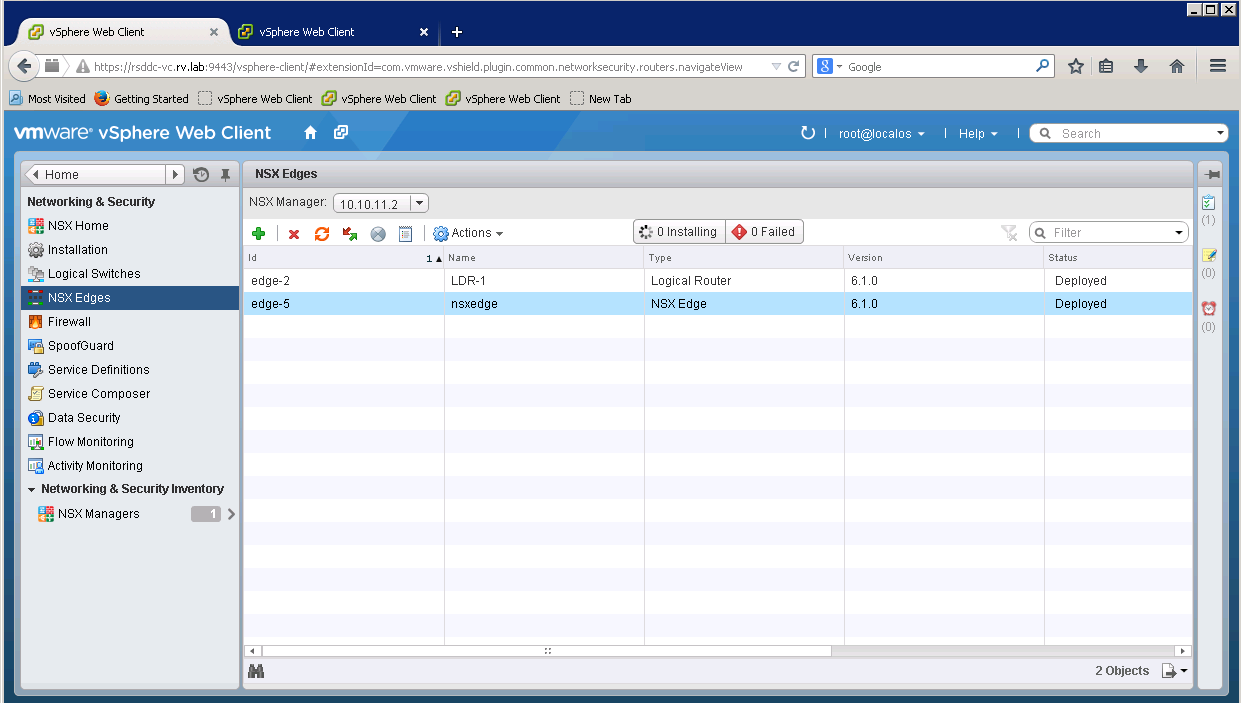
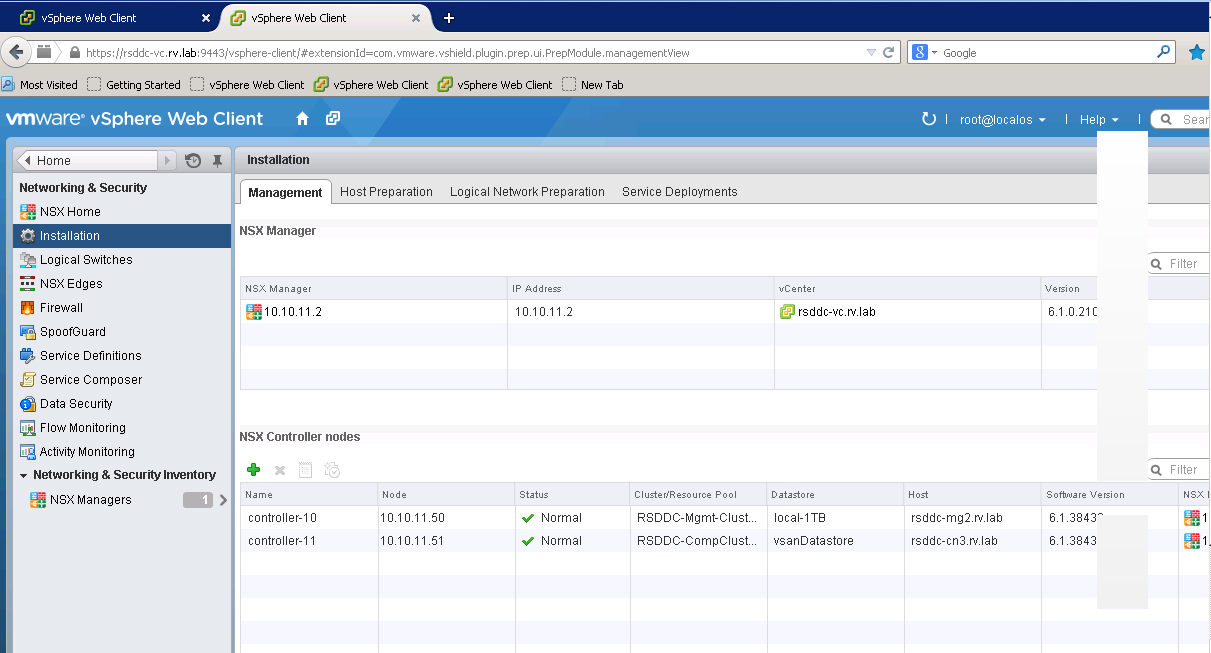
After successful deployment, you will see NSX Controllers are installed.
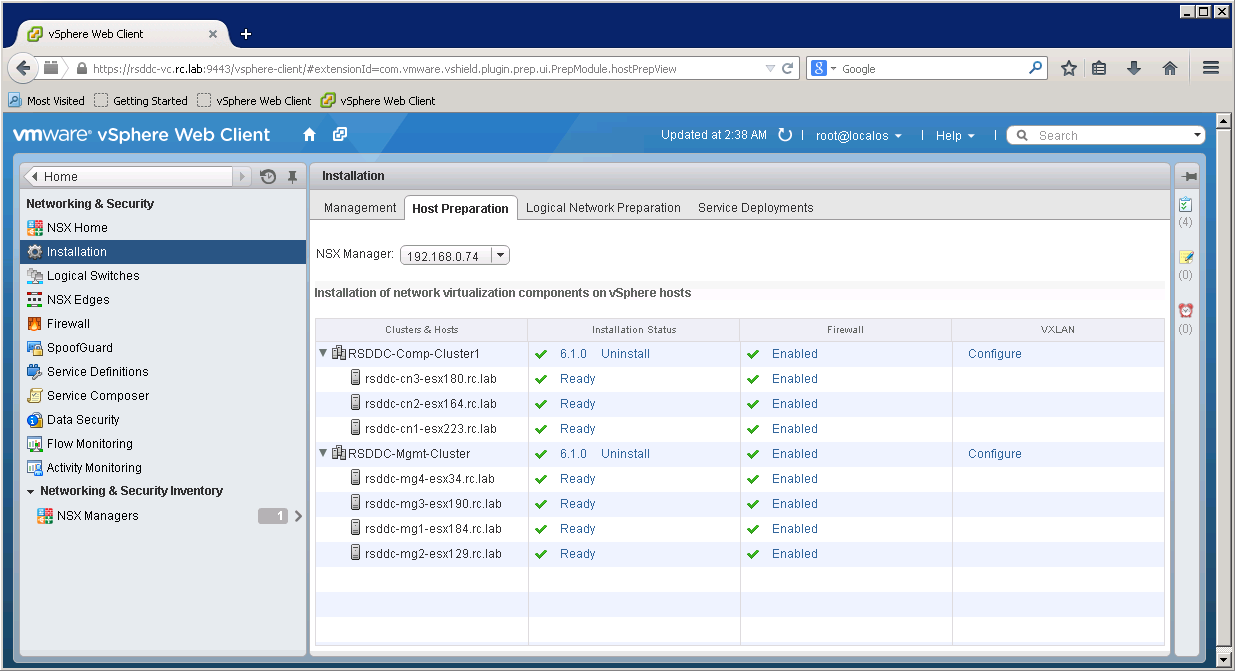
Host Preparation
The next step involves in preparing all hosts in cluster to enable NSX services.
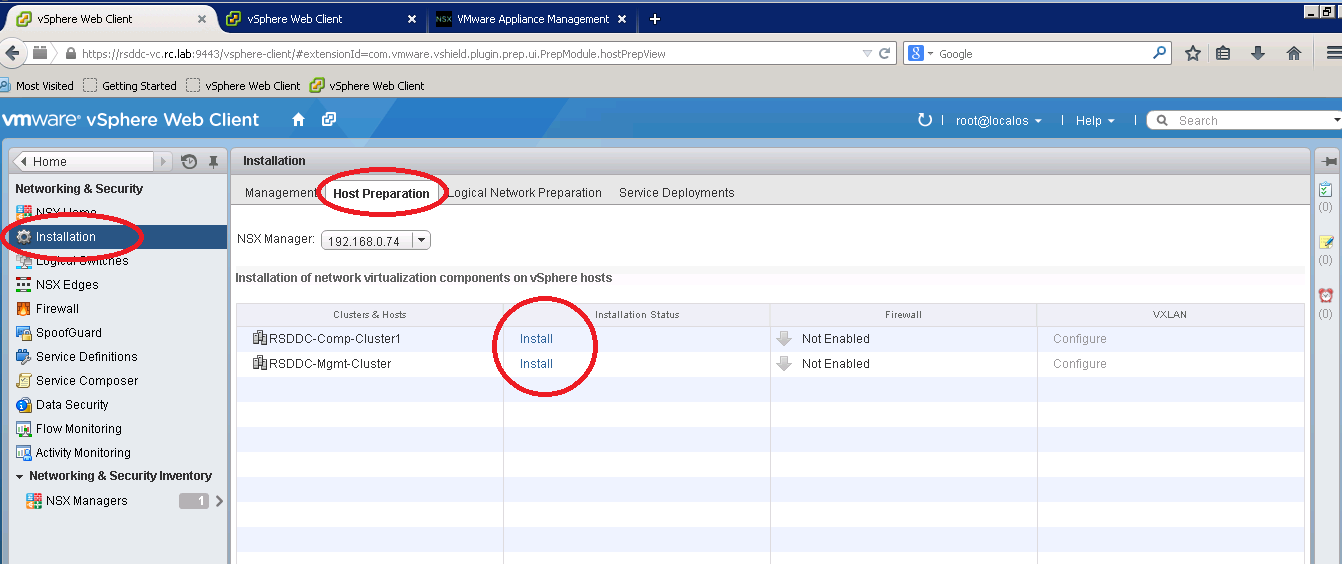
NSX Manager installs necessary components on all hosts in cluster and then hosts are ready to configure. After successful deployment, you will notice all ESXi Hosts in the cluster are in Ready state
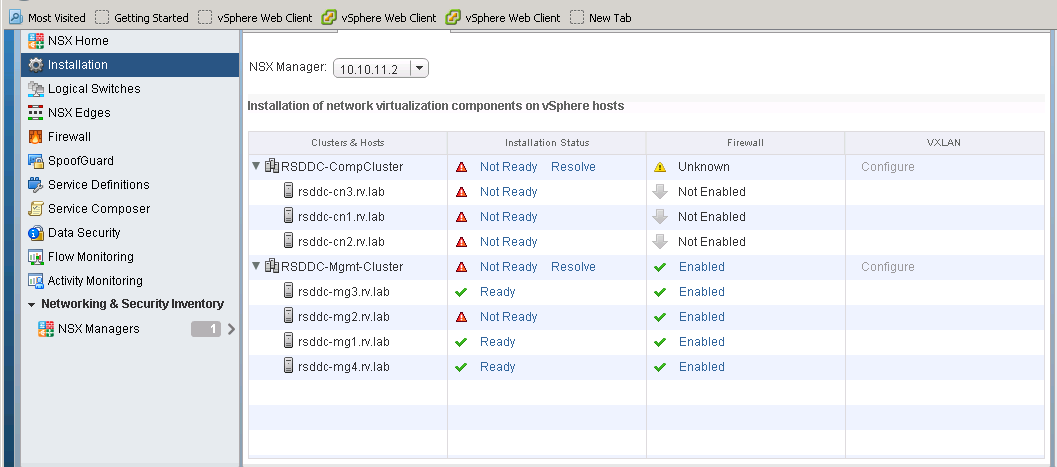
Debug Stuff
I ran into strange problem while preparing hosts for NSX. Apparently some of my Hosts are failing the installation.
I looked at NSX Manager log and VirtualCenter log and could not find anything that can point to the issue.
Basically, NSX is installing VXLan VIB as part of the Host Preparation. The VIB installation on ESXi usually gets logged into esxupdate.log file. There I found the following error
/var/log/esxupdate.log 2014-10-13T14:10:14Z esxupdate: downloader: DEBUG: Downloading http://rsddc-vc.rv.lab:80/eam/vib?id=b2683a27-fad8-4dd0-a611-60e435da3feb-0 to /tmp/tmpgmLEeL… 2014-10-13T14:10:14Z esxupdate: esxupdate: ERROR: An esxupdate error exception was caught: 2014-10-13T14:10:14Z esxupdate: esxupdate: ERROR: Traceback (most recent call last): 2014-10-13T14:10:14Z esxupdate: esxupdate: ERROR: File “/usr/sbin/esxupdate”, line 216, in main 2014-10-13T14:10:14Z esxupdate: esxupdate: ERROR: cmd.Run() 2014-10-13T14:10:14Z esxupdate: esxupdate: ERROR: File “/build/mts/release/bora-2068190/bora/build/esx/release/vmvisor/sys-boot/lib/python2.6/site-packages/vmware/esx5update/Cmdline.py”, line 106, in Run 2014-10-13T14:10:14Z esxupdate: esxupdate: ERROR: File “/build/mts/release/bora-2068190/bora/build/esx/release/vmvisor/sys-boot/lib/python2.6/site-packages/vmware/esximage/Transaction.py”, line 71, in DownloadMetadatas 2014-10-13T14:10:14Z esxupdate: esxupdate: ERROR: MetadataDownloadError: (‘http://rsddc-vc.rv.lab:80/eam/vib?id=b2683a27-fad8-4dd0-a611-60e435da3feb-0’, None, “(‘http://rsddc-vc.rv.lab:80/eam/vib?id=b2683a27-fad8-4dd0-a611-60e435da3feb-0’, ‘/tmp/tmpgmLEeL’, ‘[Errno 4] IOError: <urlopen error [Errno -2] Name or service not known>’)”)
Apparently, the Virtual Center Hostname is not reachable from ESXi, as a result the VIB download from VirtualCenter is failing. After fixing DNS server entry on ESXI, I was able to install VIB perfectly fine.

Lesson Learned: Fix DNS servers everywhere!!
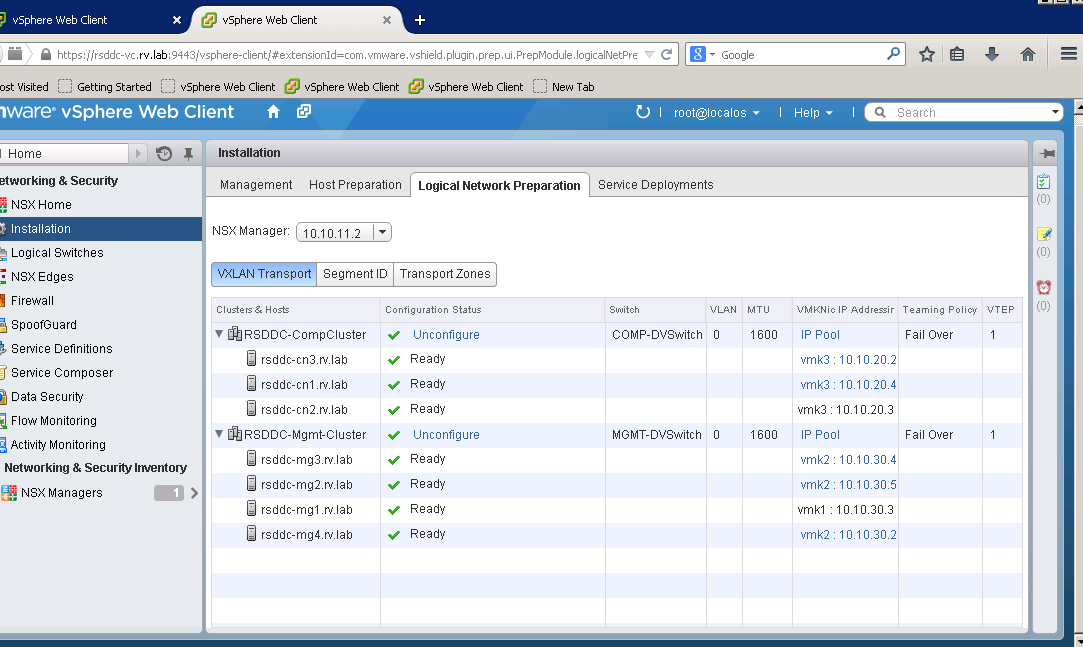
VXLAN Transport setup
Now we establish VXLan transport for clusters. VXLan is encapsulated VLAN frames over IP frames and sends over other hosts in the cluster. When you setup VXLAN transport, a vmkernel interface is created that encapsulates VLAN traffic into VXLAN frames and sends it over to other hosts in the cluster.
For the Nested setup, I have assigned two separate DVSwitches, COMP-DVSwitch(vlan:10.10.20.x) for RSDDC-CompCluster and MGMT-DVSwitch(vlan:10.10.30.x) for RSDDC-MgmtCluster. After you configure and install VXLAN Transport, you will see the vmkernel interface created on each host in the cluster and they are associated to network.
Segment ID and Transport Zones
I have set Segment ID range about 5000-5999 and didn’t turn on multicast. I set one Transport Zone that is called Universal Zone. It spans all the clusters in the Datacenter
Logical Switches
Now we are ready to play with Network Function Virtualization, component called Logical Switch. A Logical switch is where NSX can deliver all NFV Services such as Firewall, DHCP, Logical Router etc.
Let us create two three logical switches for the purpose of this demo
- Gold Tier
- Silver Tier
- Transport Switch
It is also the place where we can provide differentiated network services to VMs. So for example, if VM requires firewall protection, then we can simply apply this VM to Gold Tier Logical Switch etc
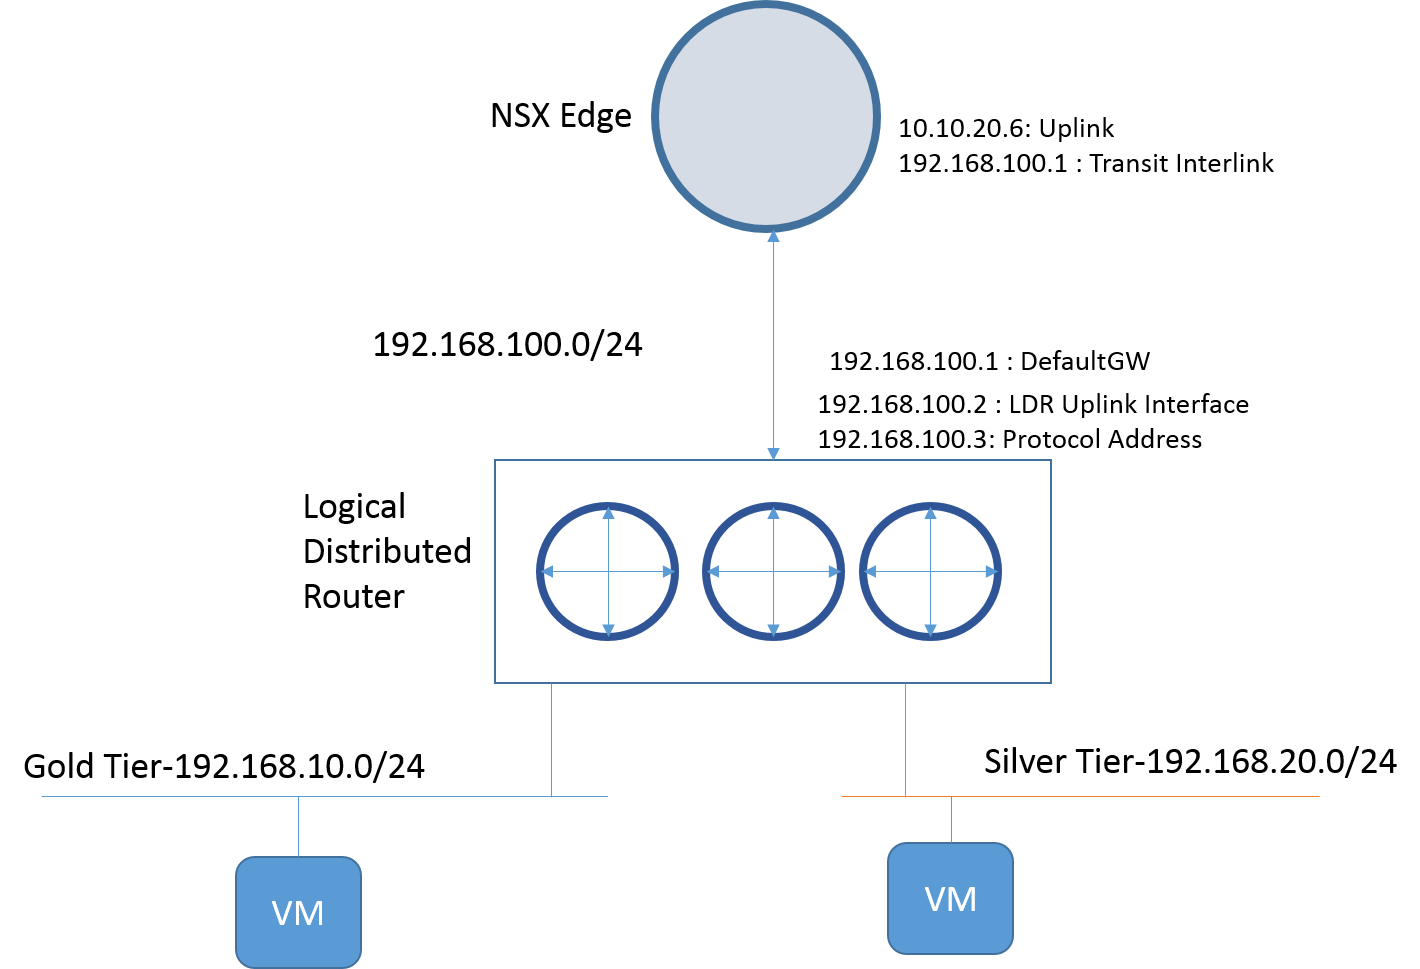
Here is network diagram we will be setting up
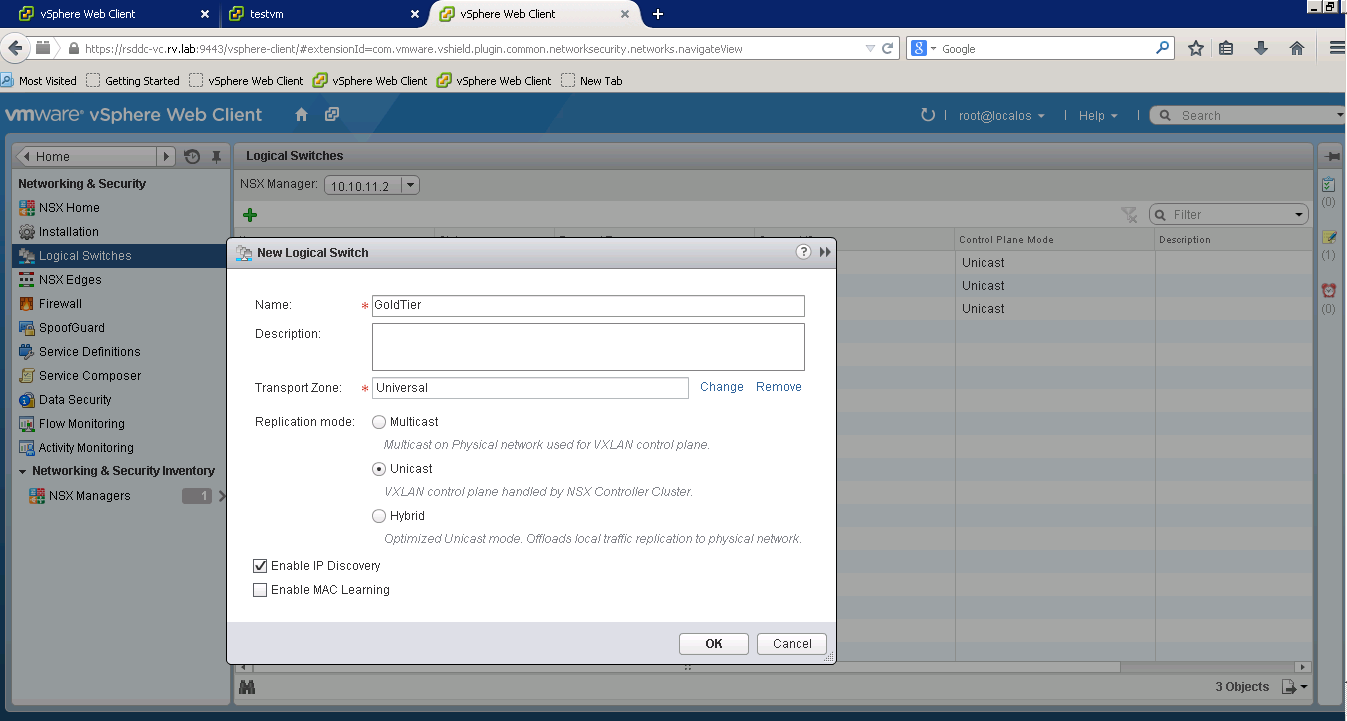
Set up Logical Switches
On Logical Switches section, press green “+” sign, that should pop up New Logical Switch window. Enter already created transport zone and select unicast method.
Similarly create other Logical Switches as shown below

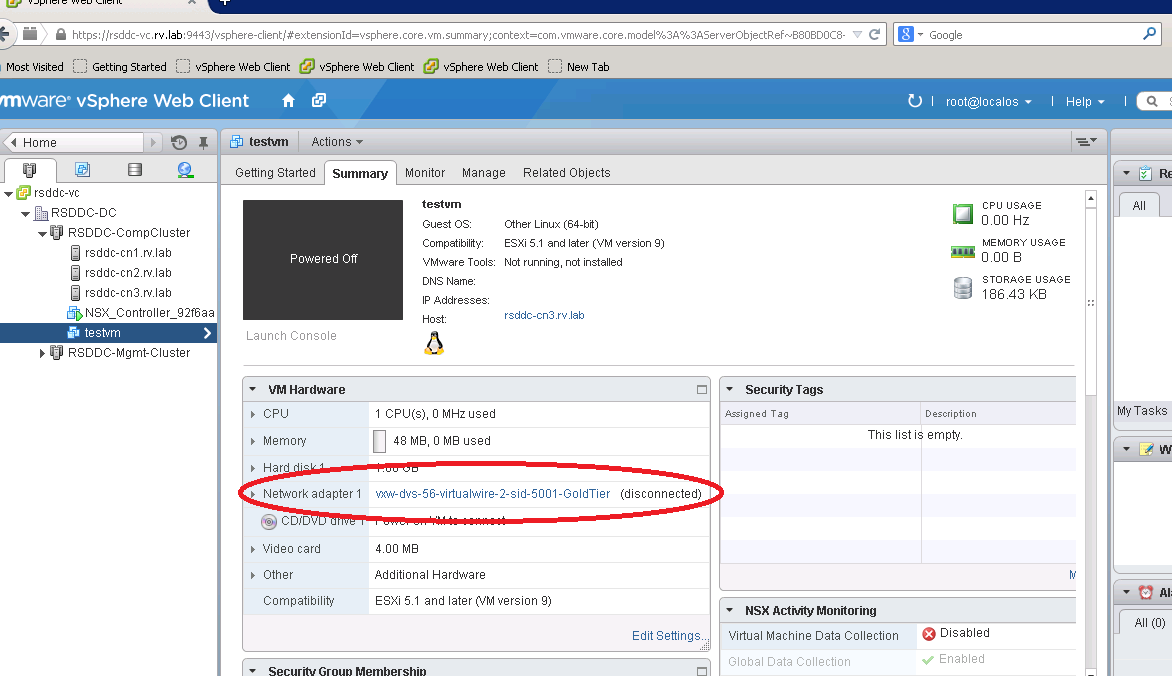
Now we are ready to provision VMs to new logical switches created. I have test VM on RSDDC-COMP-Cluster and let us assign it to Gold Tier and power it on!
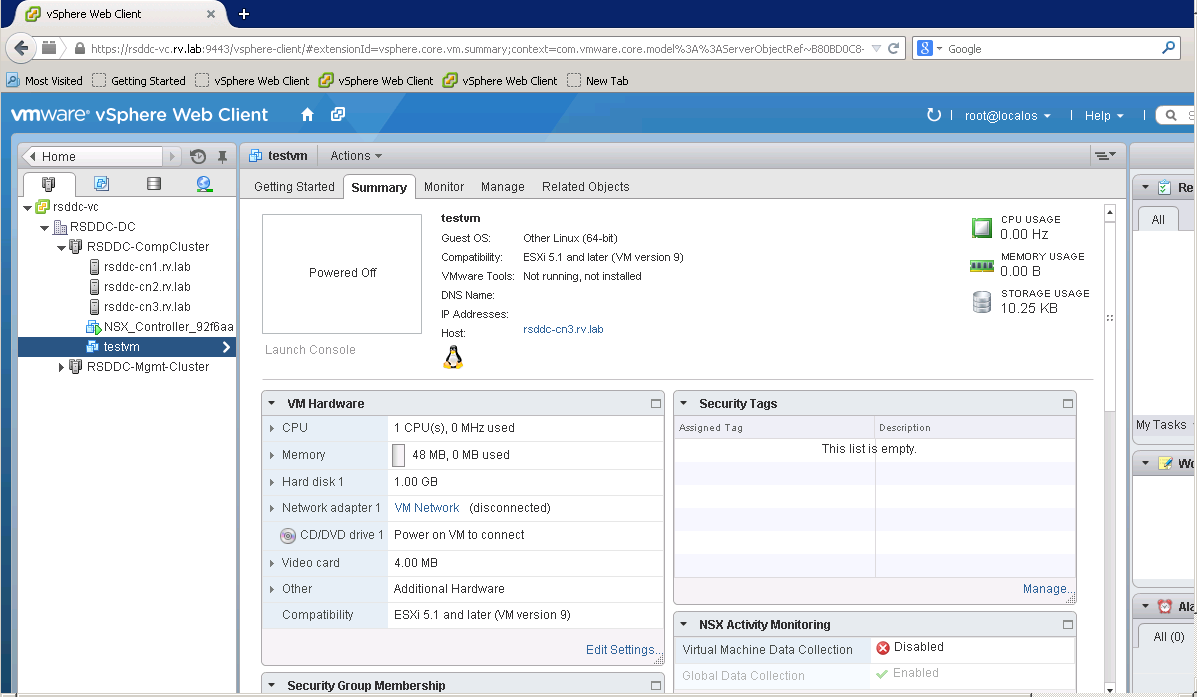
Testvm is currently tied to default VM network, when we assign it to NSX Logical switch, it will change it to Logical Switch network
Go to Logical Switches section under NSX and click
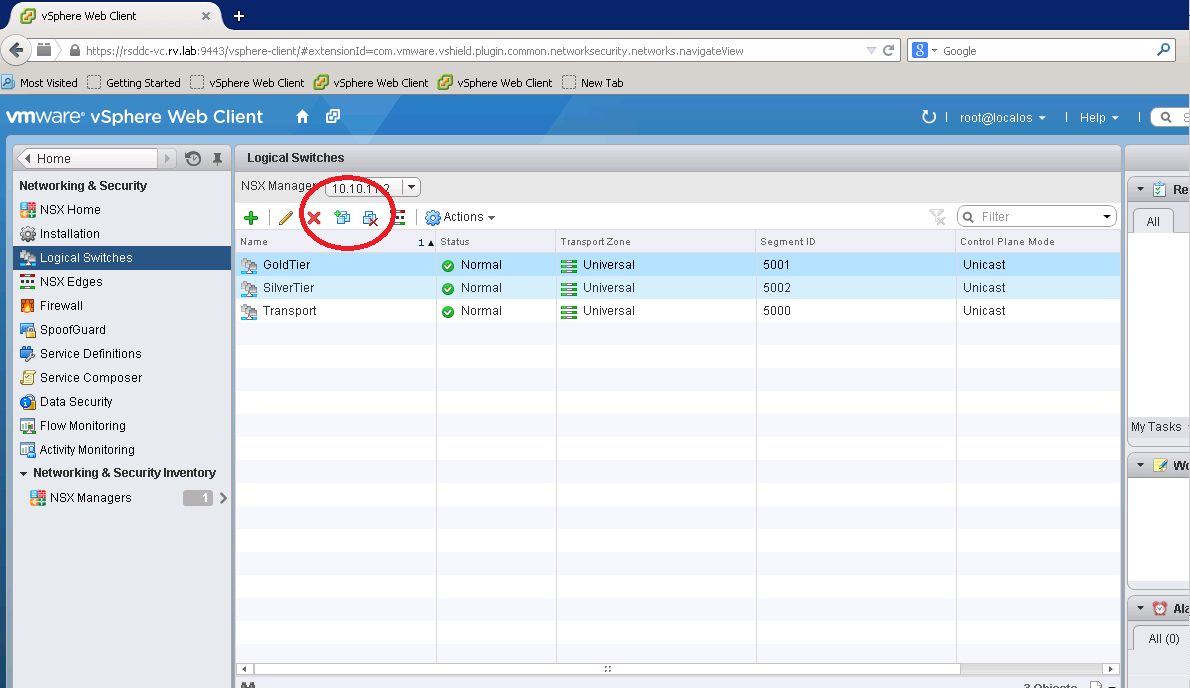
It will pop up new window showing list of VMs to associate with logical switch
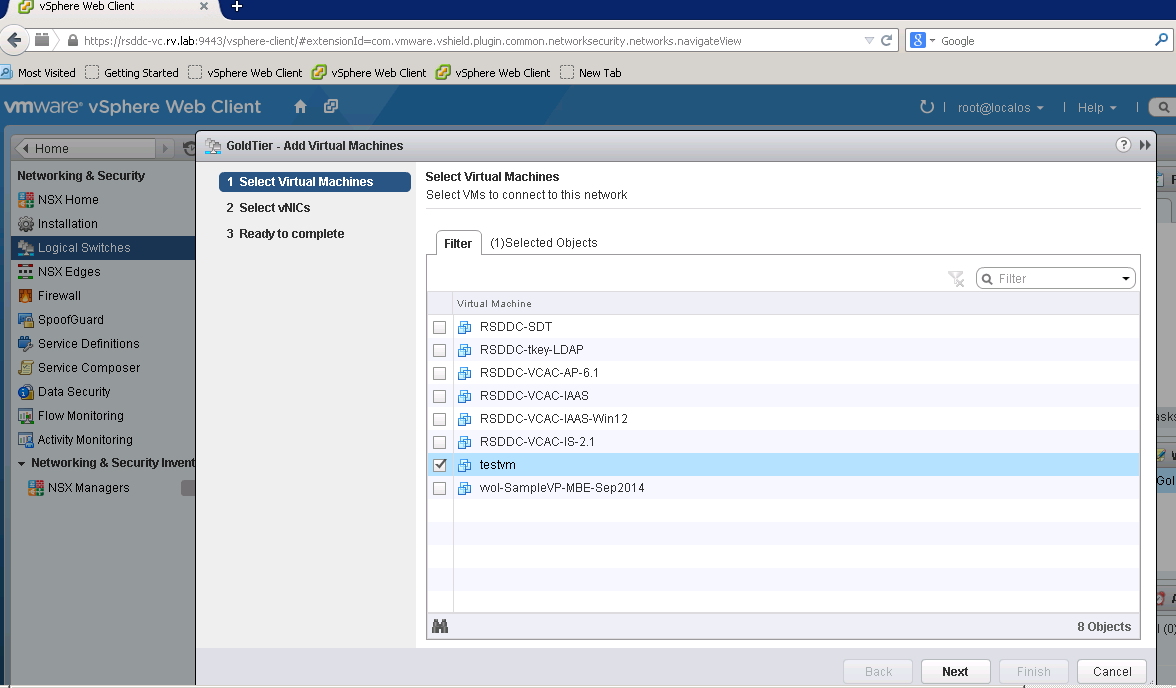
Now you can see testvm is assigned to GoldTier Logical Switch
Setting up LDR and NSX Edge
Logical Distributed Router provides IP routing for VM to VM traffic within Datacenter (aka East to West traffic). In this scenario, we have two tiers (Gold and Silver tier) that require routing between them. We will use LDR to get routing working between them.
Here is the network diagram
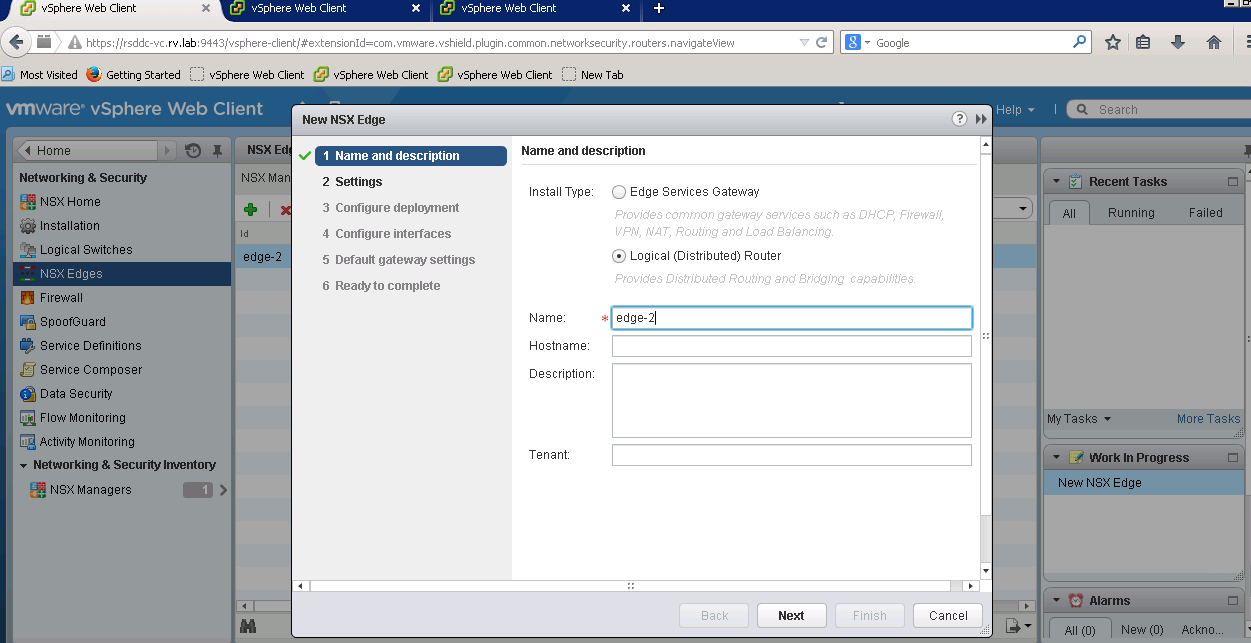
To setup LDR, go to Networking&Security UI -> NSX Edges and click green “+”
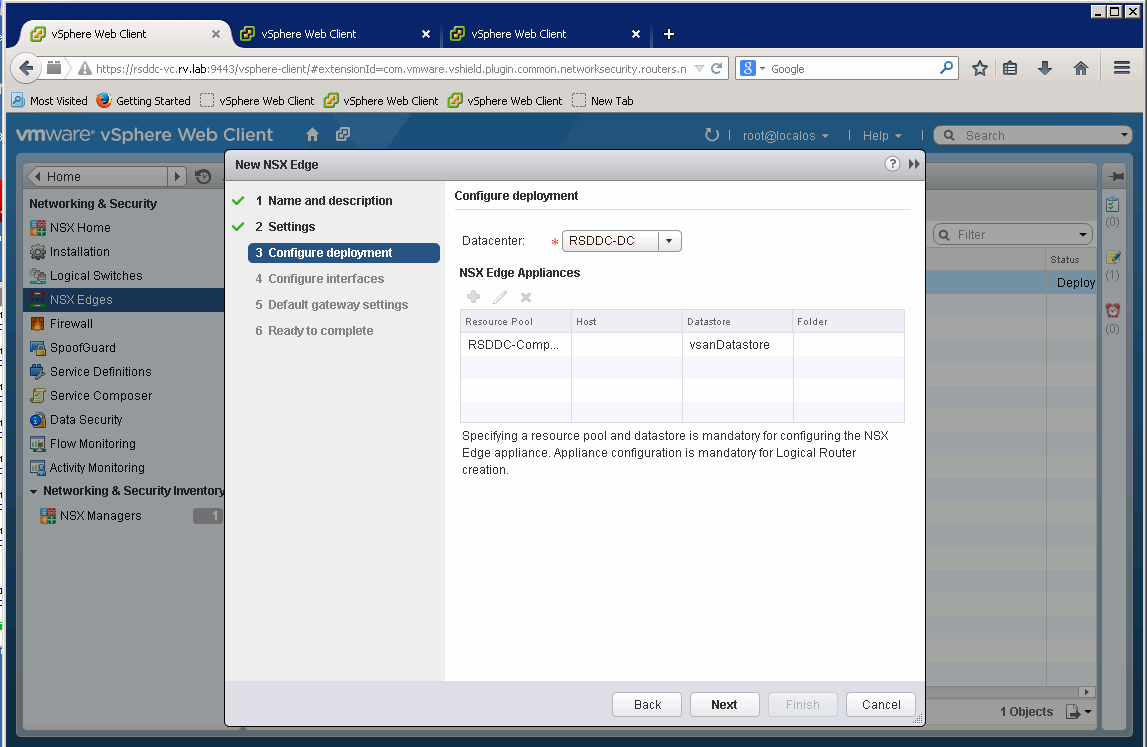
Select Cluster and Datastore to deploy NSX Edge (LDR Control VM)
Add Management interface and routing interfaces to NSX LDR
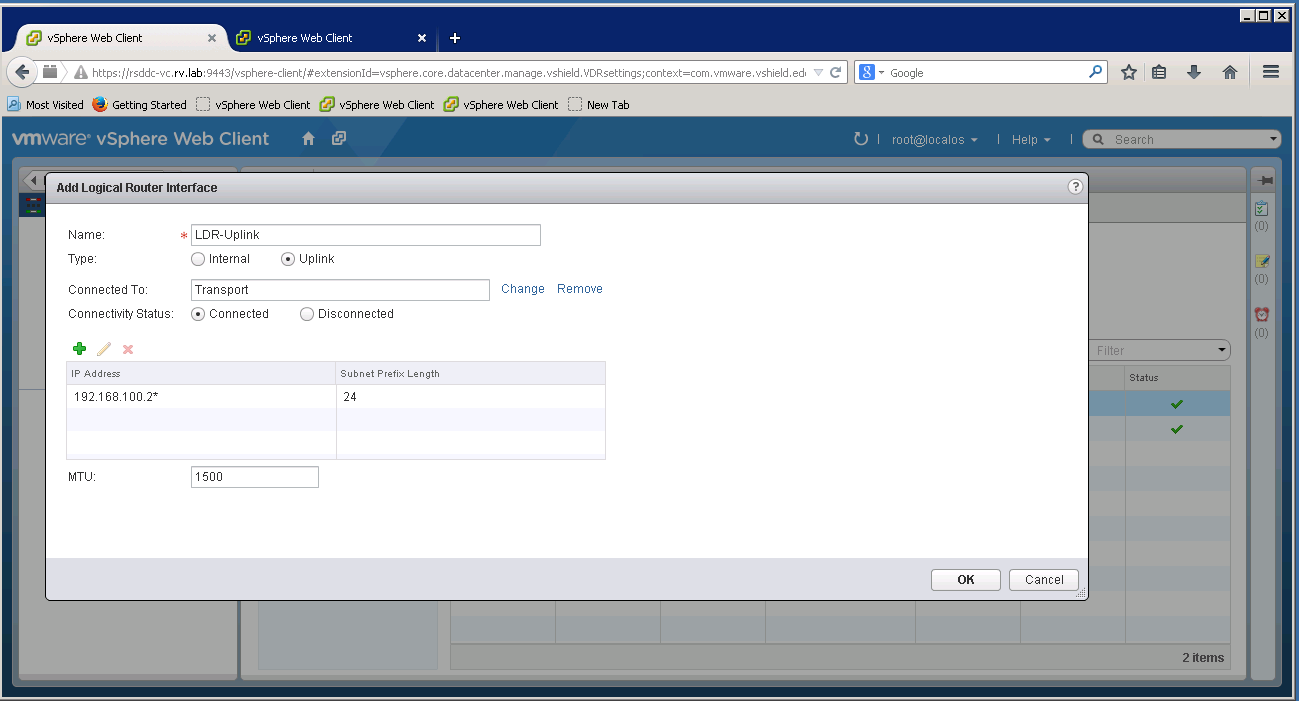
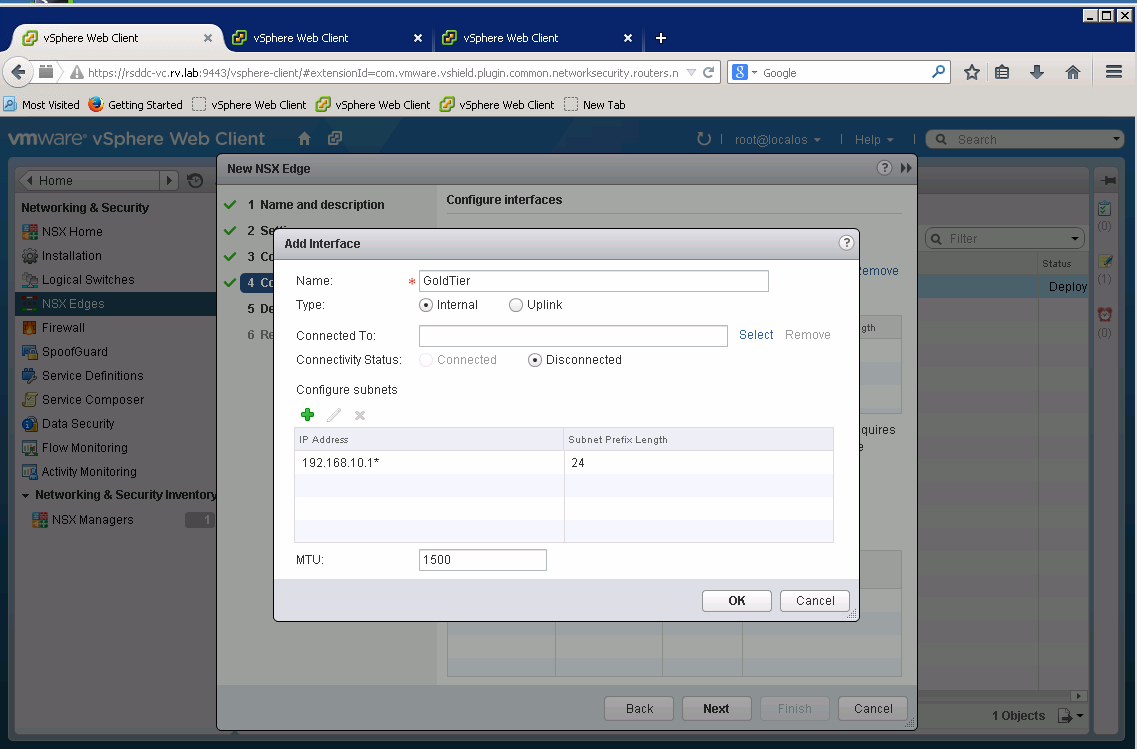
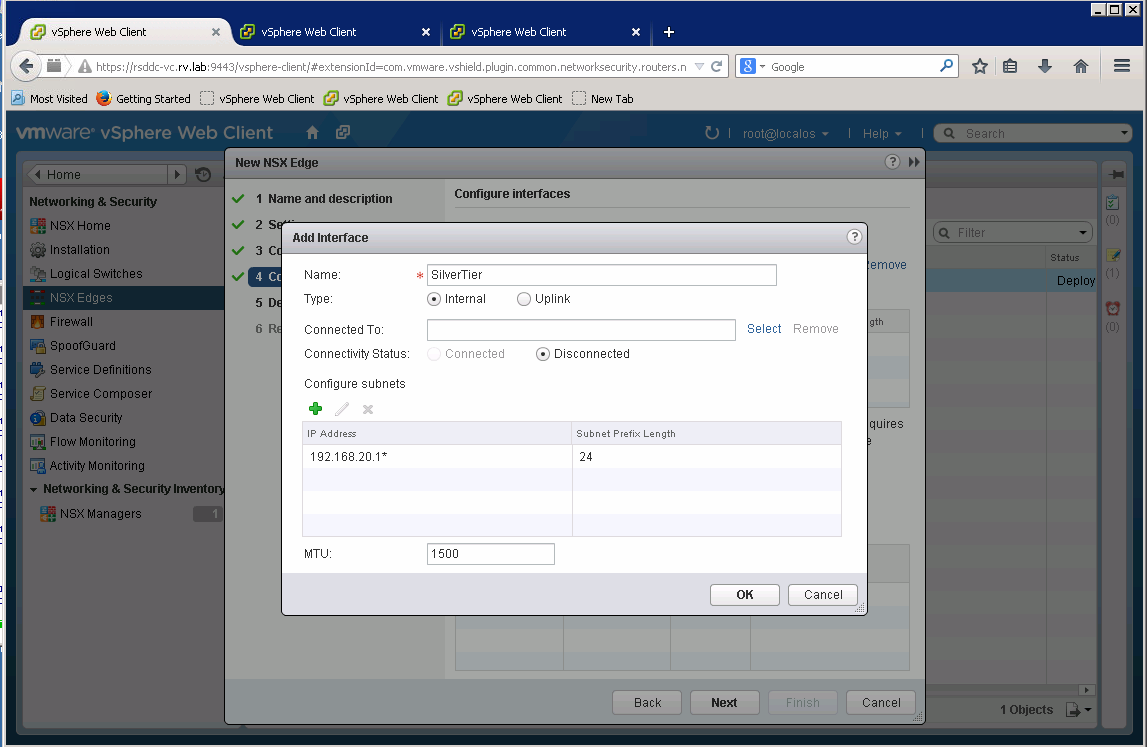
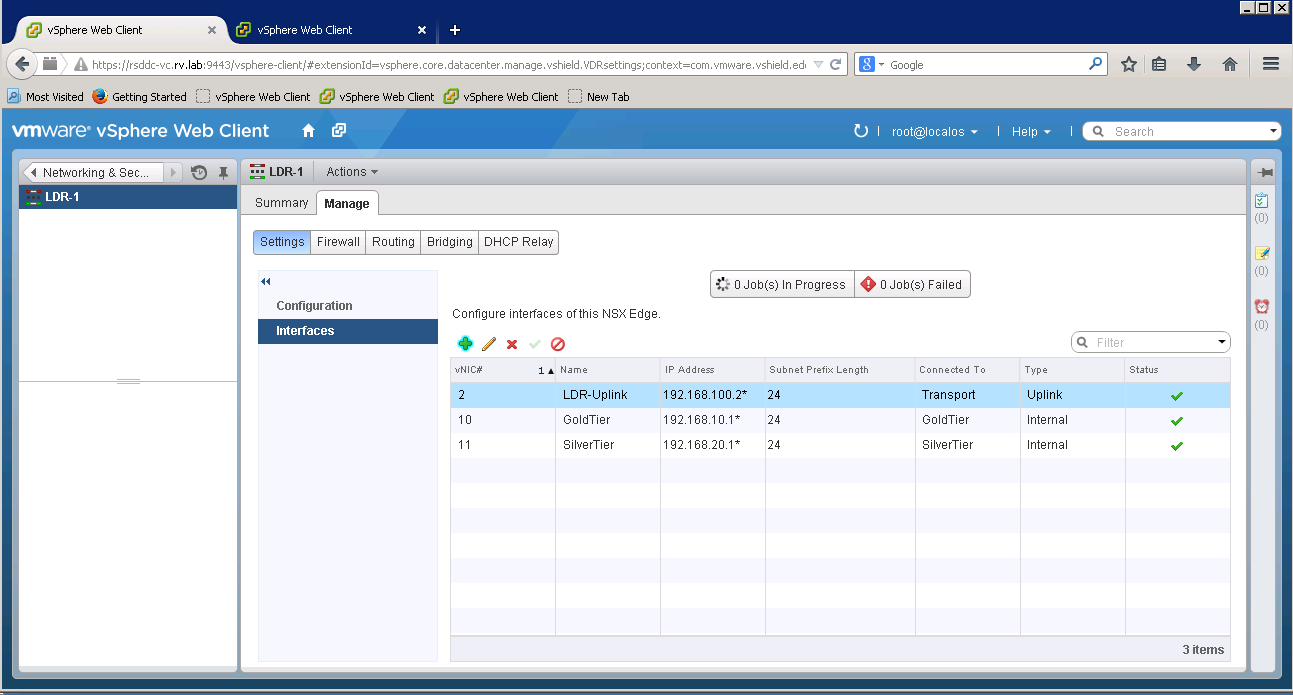
After all interfaces are setup, the interfaces tab will show as below
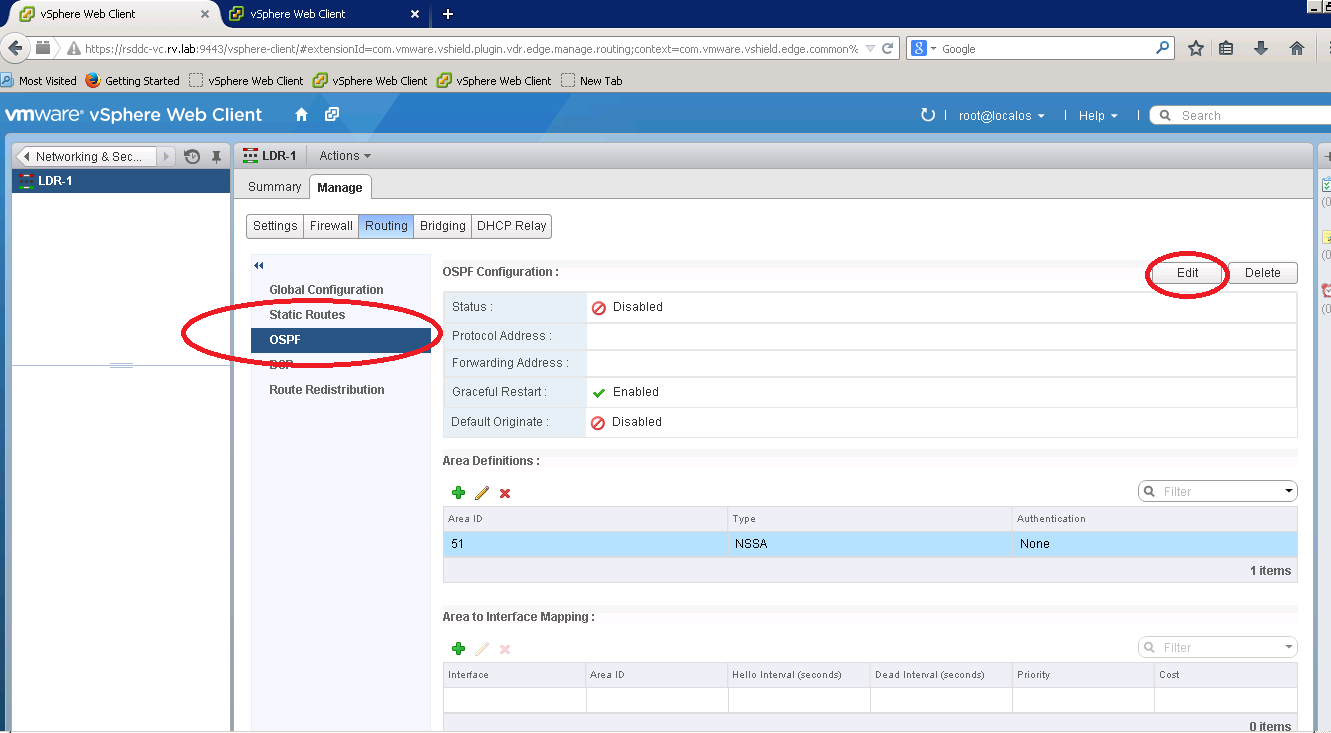
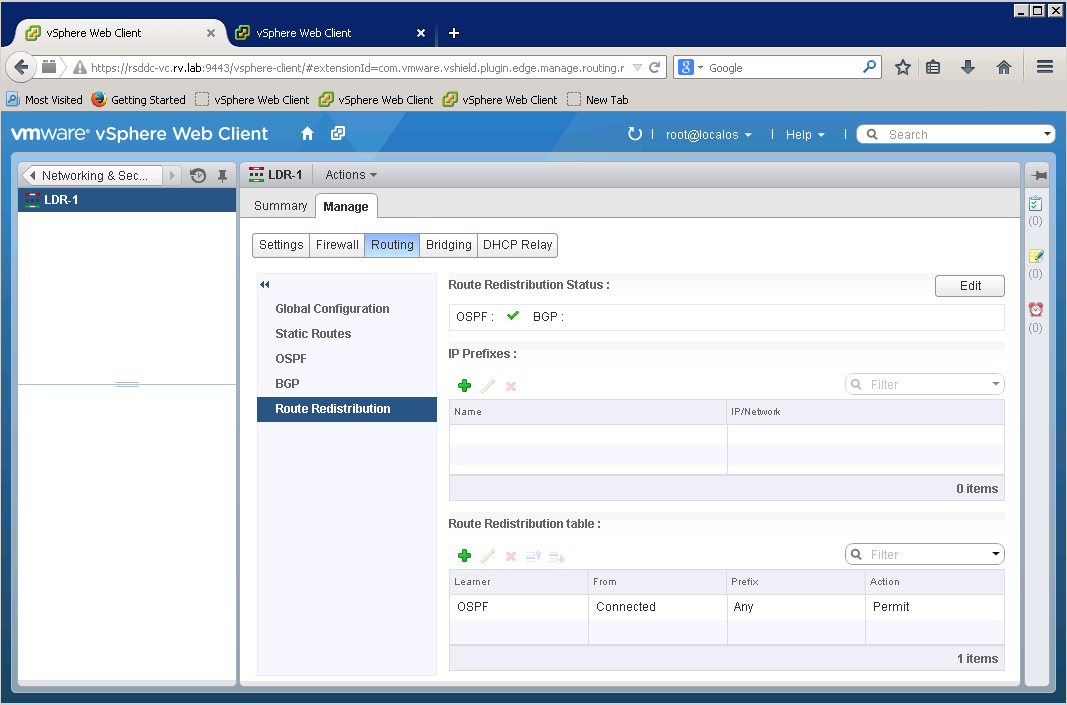
Enabling OSPF on LDR
Go to tab created for new NSX Edge (LDR-1), under Manage, you can see OSPF section
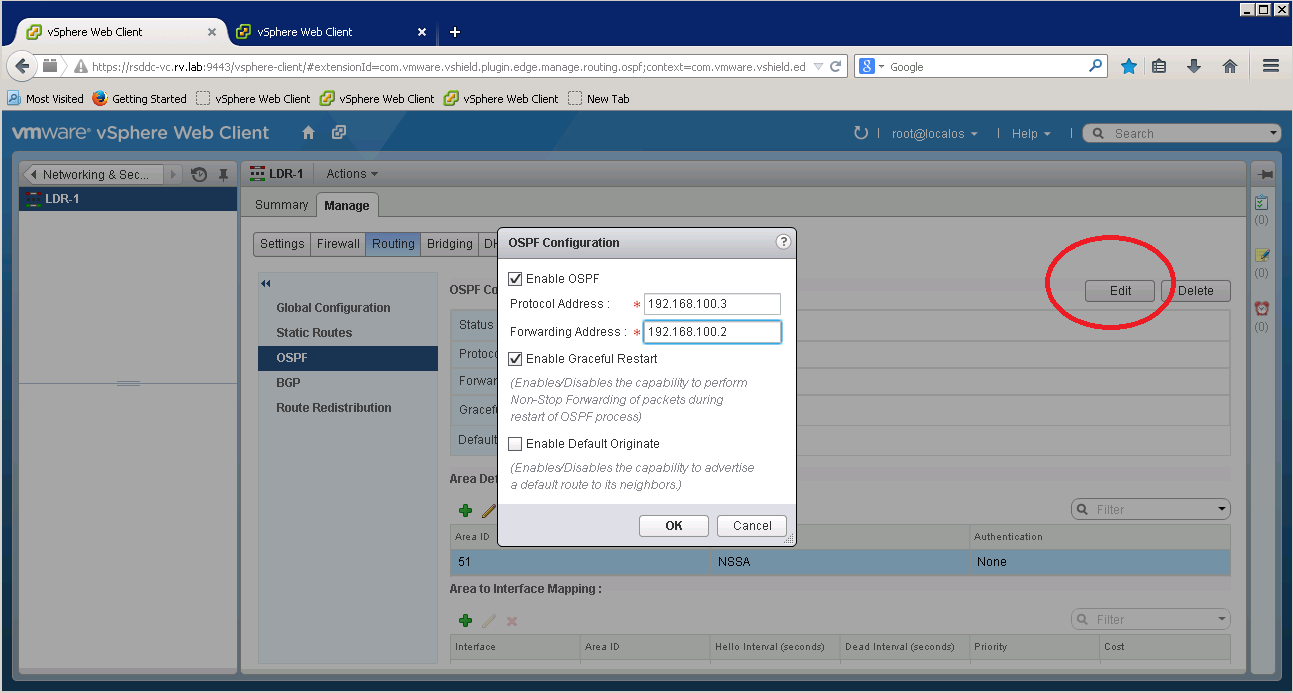
We are setting Forwarding Address as 10.10.20.5. Note this is same address as LDR-Uplink Interface for LDR. The protocol address is set to 10.10.20.6.
Set default gateway to 192.168.100.1
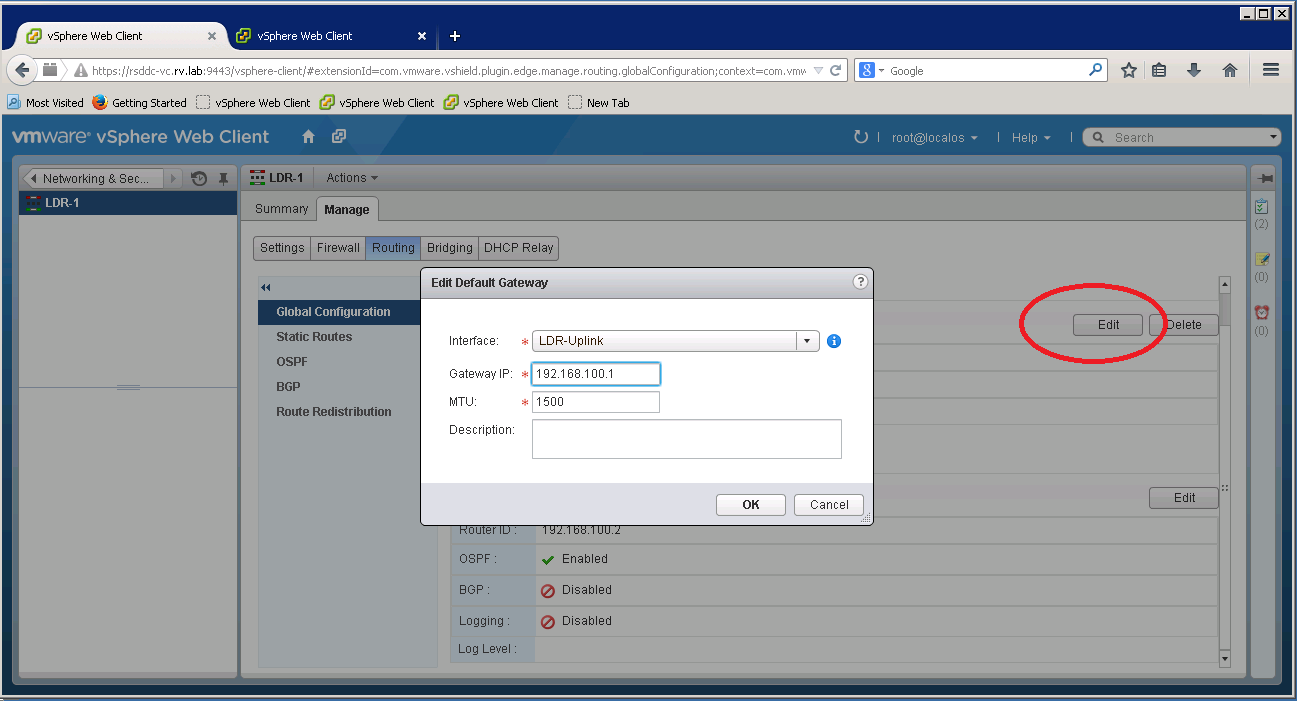 192.168.100.1
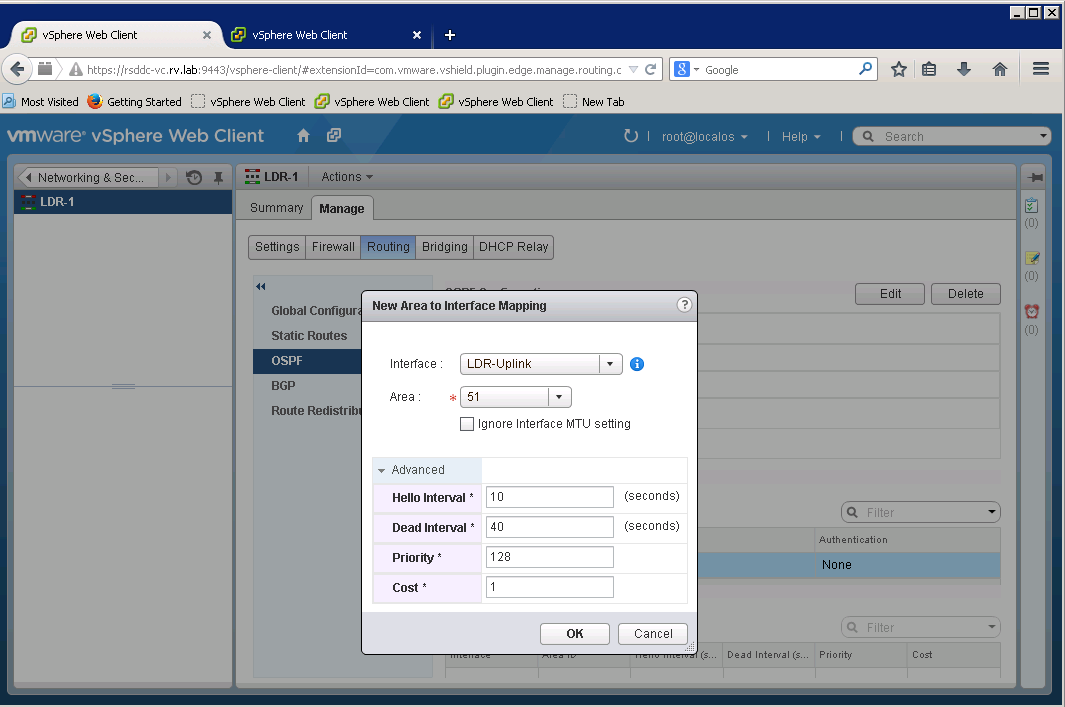
On OSPF Section, you will need map interface to Area
Finally verify that OSPF is enabled
Setup NSX Edge
Now let us deploy NSX edge to our network to provide advanced NSX Services like Firewall, DHCP, VPN etc.
NSX Edge deployment is simple and follows the same procedure as NSX LDR. On NSX Edges tab, click green “+” sign to open New NSX Edge Dialog
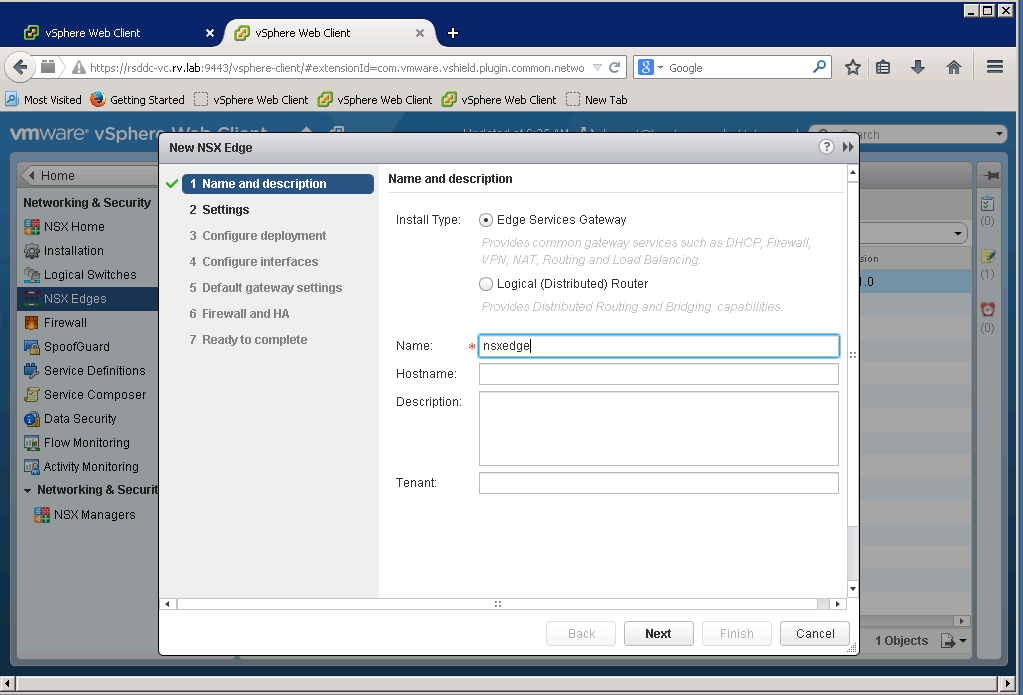
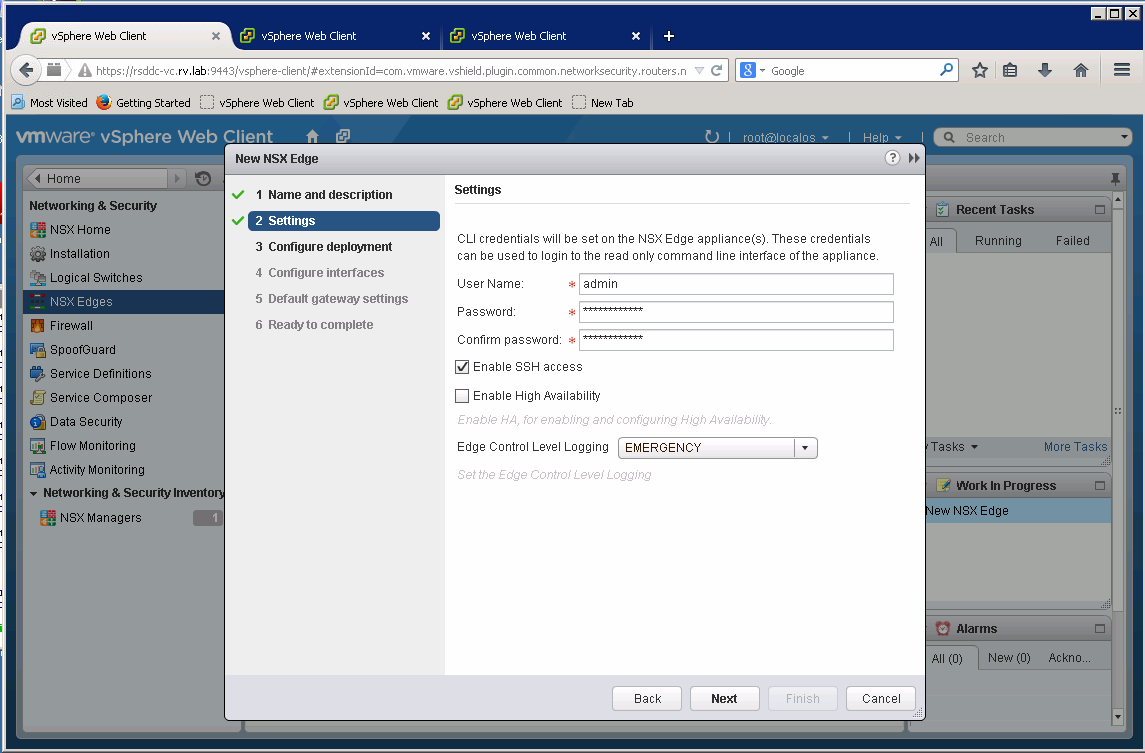
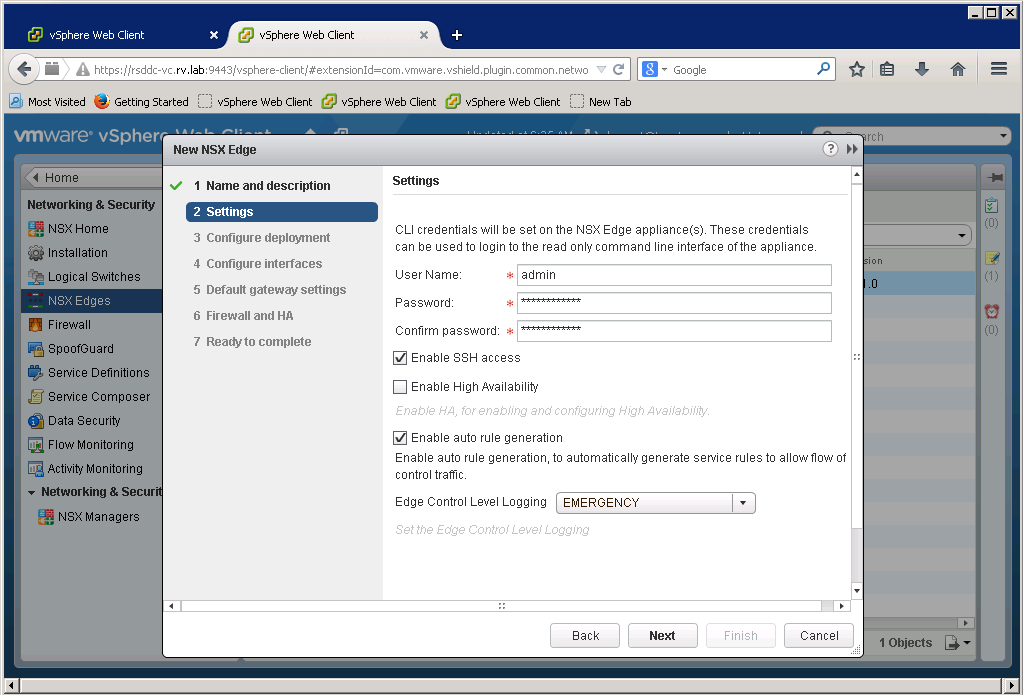
After naming the new edge, click next to enable SSH settings
Select the Datacenter to deploy NSX Edge, in our case, we only have one Datacenter RSDDC-DC. Also we choose Compact Appliance size for the lab deployment.
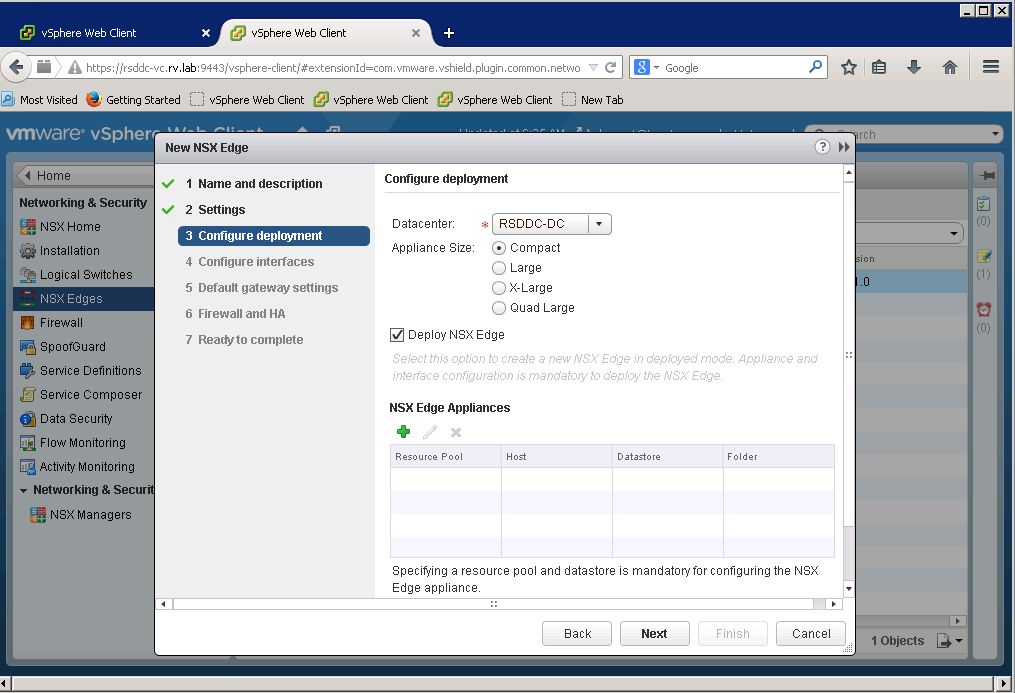
Select Cluster resources by clicking green “+” sign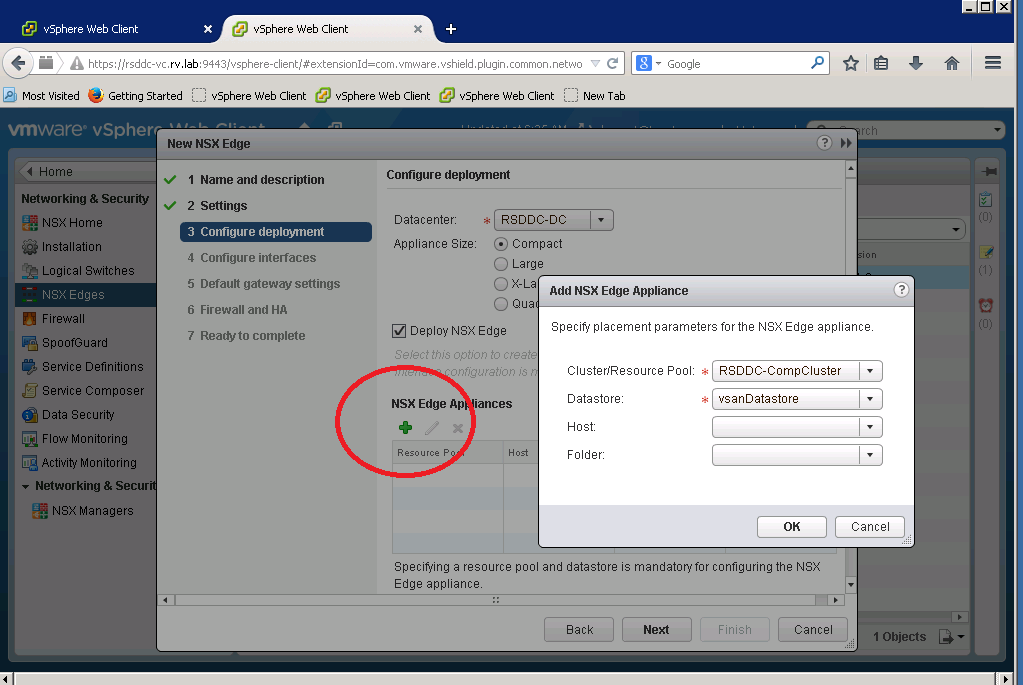
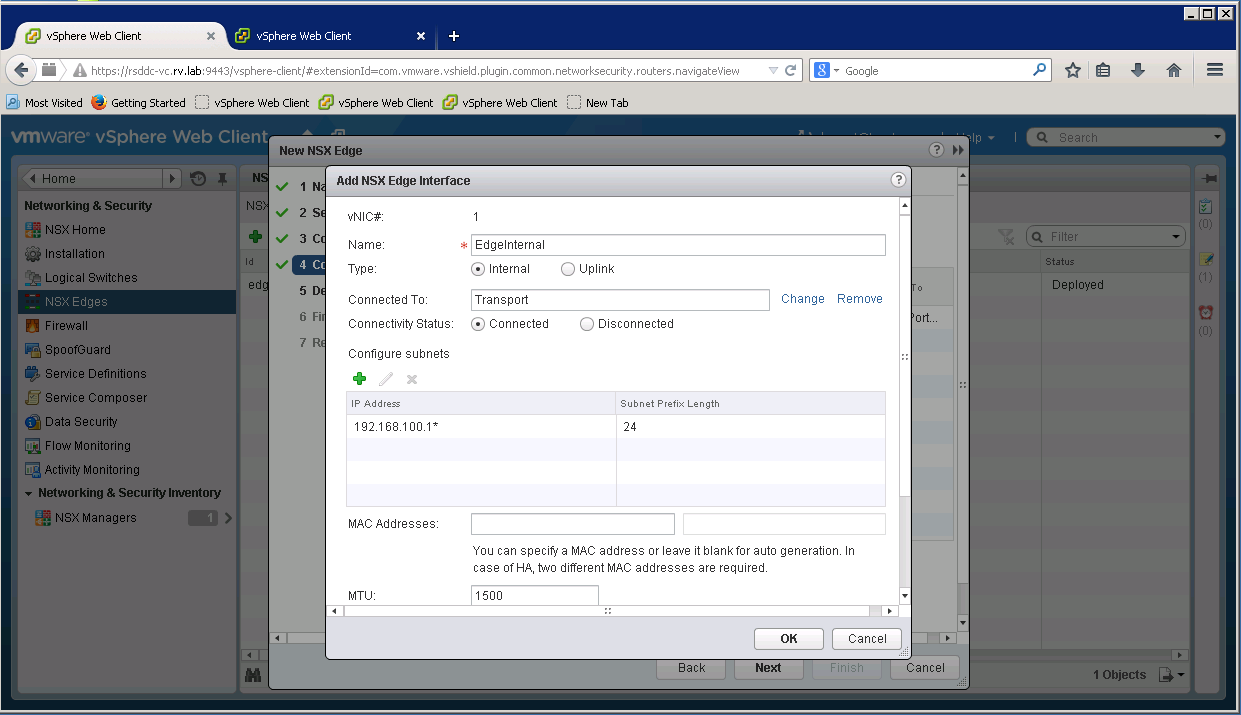
Now it is time to set NSX Edge interfaces
For NSX Edge Uplink, we set address 10.10.20.6 and 192.168.100.1 as internal link address

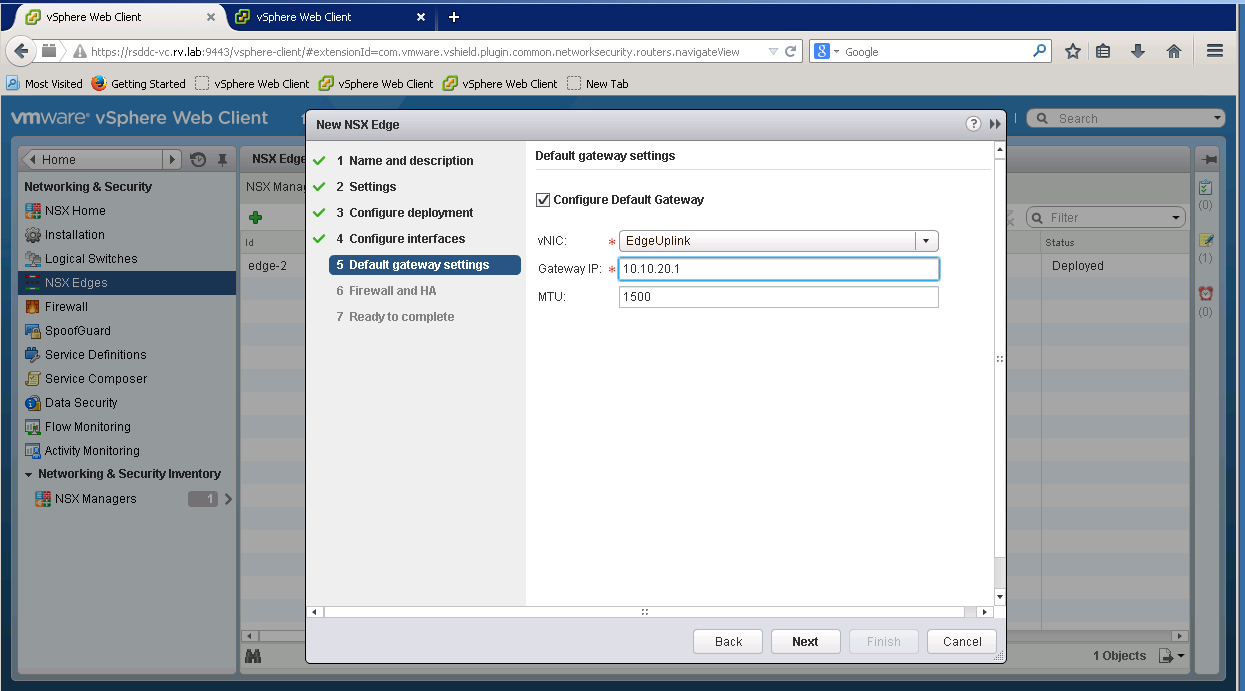
We set default gateway to outside world to 10.10.20.1
We will skip enabling Firewall and HA for this case
NSX Edge is ready for deployment
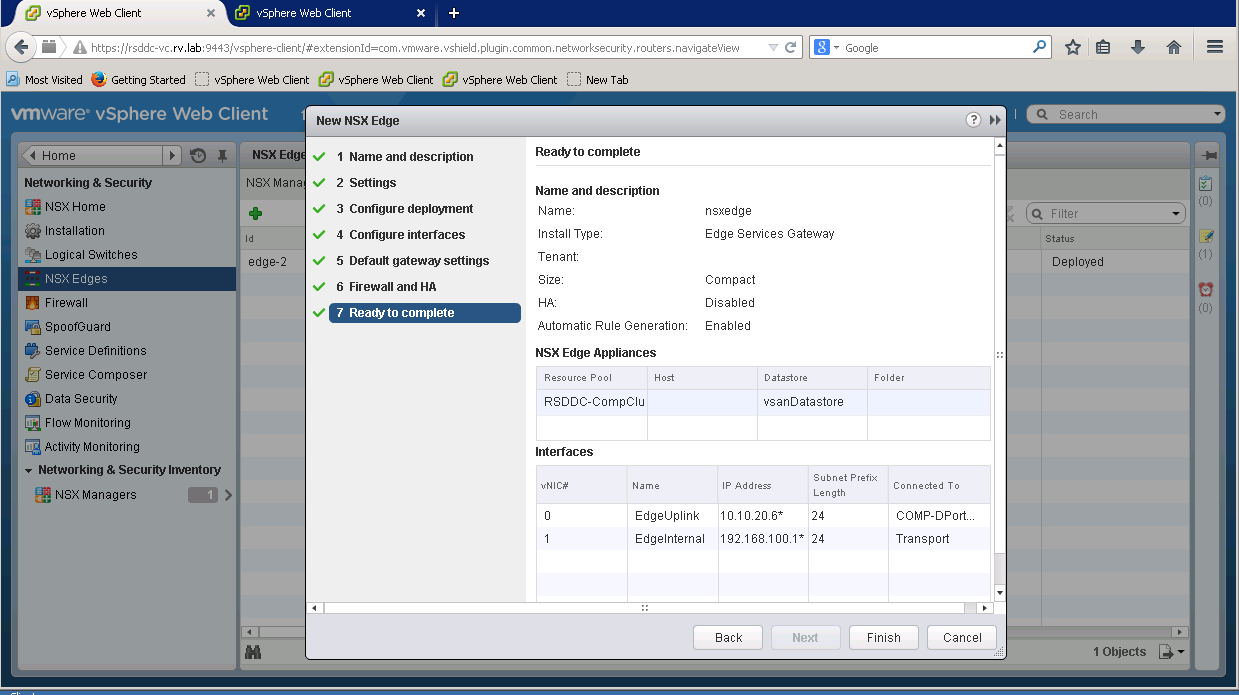
After completing deployment, you can notice successfully deployed state for NSX edge